This guide features on the website Seesaa Wiki, a Japanese game guide website. The author is nameless for this article so I unfortunately can’t give any credit to them directly, however I can state how useful and engaging it was and the benefits it can yield either before, during or after your playthrough of Subnautica! There’s a lot of text here however the topics are not too advanced. I would wager if you’re at an N3 level you could likely read through most of this with only a little bit of dictionary work. The language is heavily informative and ties to actions and experiences that you can witness either in Subnautica, your own life or a variety of other films, shows and games. The vast majority of the words featured show in the top 1,000 or 2,000 words you’d need to work or live in Japan so while they help you enjoy this beautiful game and its specifics, they’ll also strengthen your day to day reading.
Link: https://seesaawiki.jp/subnautica_jp/d/%bd%e9%bf%b4%bc%d4%a5%ac%a5%a4%a5%c9
Total required words: 411 Words
Difficulty: High Intermediate (JLPT N3/N2)
Glossary
Translation Guide
初心者ガイド
Translation
Beginner’s guide
初めてプレイする方へ
本項では多少なりともネタバレを含みます。
まっ更な状態でプレイしたい方は、先にプレイを進めることをオススメ致します。
本ゲームは基本的に「PDA内の文章」を読むことでヒントを得ます。
特にスキャナーによるスキャン結果は単なる読み物ではなく、そのアイテムが利用できるか否かを教えてくれますので、これらを上手く利用することであまり迷うような要素は無いようになっています。
また基本的にはサバイバルモード、ハードコアモードを基本として記載しております。
Translation
For first time players
This section contains a fair amount of spoilers.
For those players that want the purest experience we recommend you go and play the game beforehand.
In this game the basics involve reading entries within your PDA in order to gain clues.
In particular, the result of scanning things with your scanner isn’t simply to read the entries for those items. Here we’ll tell you if you’ll be able to use those items or not so you can make use fo them and get rid of any elements that may get you lost.
Again, quite simply, we’ve published the basics that relate to survival and hardcore mode here.
まずは生き延びる
他のサバイバルゲームと違い、Subnauticaでは大海原に一人放り出されるといったようなことはありません。
生存の拠点となり、基本的な生産が行える脱出ポッドからゲームは始まります。
始まってそうそう内部が派手に燃えていますが(消火器を拾って消しましょう)
酸素(O2)は海面まで上がれば補給できますし、序盤は体力(ヘルス)が削られる事態もさほど多くありません。(慎重に行動していることが前提ですが)
Translation
First, survive
In a different way to other survival games, Subnautica doesn’t just leave you all alone in the great depths.
You’ll start the game in an escape pod that will act as your survival base and allow you to create basic essentials. As you start, you’ll see that the interior is quite glaringly on fire (Let’s grab the fire extinguisher and put that out). You can replenish your oxygen (O2) providing you rise to the surface and there won’t be much in the early stages of the game that can chip away at your health (On the prerequisite that you act carefully).
ただし満腹度とH2O(水分)は非常に早く減ります。この二つを解決できるかどうかが序盤の勝負と言えます。
脱出ポッド内のストレージに食料と水が入っていますが数個しかありません、すぐに現地調達を始めましょう。
ゲームを進めると「放射能」や「感染」といったワードが出てきますがこのゲームに時間制限はありません。
空腹と渇きさえ解決できるならばのんびりじっくりと探索ができます。生存を優先しましょう。
Translation
However, your satiety and H2O (fluids) will decrease extremely quickly. You could say that being able to resolve these two things or not is the challenge of the early stages of the game.
The storage inside the escape pod has supplies and water however only a small number of each. We’ll quickly need to start procuring from the local environment.
As the game progresses word such as “radiation” and “Infection” will start to pop up, however this game has no time limit. If you’re able to resolve your hunger and thirst you can explore at your own leisure. Let’s prioritize survival.
空腹への対応
空腹に関しては泳いでいる魚を手で掴み、脱出ポッド内のファブリケーターで調理することで簡単に解消できます。
生魚よりも調理したほうが満腹度やH2Oが回復します。
生魚は新鮮なまま持ち歩けますが、調理した後はだんだん腐っていくので傷まないうちにすぐ食べましょう。
塩を持っていれば塩漬け調理をして劣化を防げますが、食べると少し喉が渇きます。
しかし食べられる魚が近くに居ないことや、魚が危険な生物の近くに逃げてしまうこともあります。
本当に食べるものが何もない場合は、ナイフが必要ですが波に揺らめく大きな海藻(クリープバイン)が助けてくれるでしょう。(お腹を壊さないように状態に注意)
Translation
Dealing with hunger
When considering hunger, you can simply resolve this by grabbing any swimming fish with your hand and cooking them using the fabricator inside the escape pod. More so than raw fish, cooked fish will recover more satiety and fluids. You can carry around live fish and keep them fresh, but once you’ve cooked them they’ll gradually start to rot. Ensure you eat them soon after to avoid damaging yourself.
If you have salt you can cook pickled fish to protect against degredation but when eaten these will cause you to become thirsty.
There may be times when there are no edible fish nearby, or they are fleeing away from other dangerous fish. You’ll need a knife in order to get it but, in cases where there really isn’t anything to eat, that giant kelp (Creepvine) swaying in the waves can really help you out. (Watch out for the condition on it so you don’t ruin your stomach).

サバイバルナイフは黄色く光るクリープバインの種をファブリケーターにかけてできるシリコンゴムと、石灰岩を叩き割って取り出したり金属くずから精製したりできるチタニウムから作れます。(クリープバインの種を取るときは周りに注意、肉食魚のストーカーが周遊している時があります。)
ちなみに満腹度は100を超えて回復させることができます(例:満腹度98の時に調理済みピーパー(満腹度+32)を食べた場合、満腹度は130になります)。100以上の時は何を食べても回復しません。
Translation
The survival knife can be made from silicon gum, made from putting the glowing yellow seeds from the creepvines into the fabricator, and titanium, taken from splitting open limestone or refining from metal scraps. (When collecting creepvine seeds be wary as there are times when carnivorous stalkers will be circling around.
Do keep in mind that your satiety can exceed 100 (For example: If your satiety is 98 and you eat a cooked peeper (Satiety +32) then your satiety will become 130). When above 100, no matter what you eat it won’t recover more.
渇きへの対応
渇き(H2Oゲージの減少)に対しては水の確保が必要です。
まずはブラダフィッシュ(旧名エアサック)という水風船のような魚を獲ってファブリケーターを使いろ過した水を作りましょう。
1本の回復量は小さいですが、装備ゼロから入手できます。
これで当座を凌ぎつつ、次はナイフを作成し、チューブのような形状の大きなサンゴ(コーラルチューブ)を探しましょう。
コーラルチューブが見つかったらそれをナイフで切り付けて得るコーラルチューブのサンプルと、海底に散らばる塩とをファブリケーターで合成する事で漂白剤を作り、それをさらにファブリケーターで変換して2本作れる消毒した水を飲むのが一番有効です。
Translation
Dealing with thirst
When combating thirst (Your fluids guage going down) you’ll need to secure some water. Firstly, let’s catch a bladder fish (Formerly called an Air sac), a fish that looks somewhat like a water balloon, and use the fabricator in order to make distilled water. One bottle’s recovery amount is small but you can make them without any equipment.
At this point, this will continue to tide you by. Next we’ll make a knife and look for a large, tube shaped coral (Coral Tube). If you can find a coral tube you can cut it to receive a coral tube sample. With this and some salt, that’s scattered across the sea floor, you can synthesize some bleaching agent. This can be converted further using the fabricator to make 2 bottles of steralized water, which is the most efficient item to drink.
ただ、慣れていないと塩を見つけるのが難しく、付近にないことも多々あります。
資源はリスポーンまで時間がかかるので(アプデでリスポーンするようになりました)、周辺の塩を取り尽くすと遠出する事になります。
グラッシー台地は平地が多く視界を遮るような背の高い海藻もないので塩を発見しやすいですが、水深が深めなので酸素の量に気をつけて潜りましょう。
ちなみにH2Oは満腹度と違い100を超えて回復できない(例:満腹度95、H2O:95の時に調理アイアイ(満腹度+18、H2O+9)を食べた場合、満腹度は113まで回復しますがH2Oは100で止まり、4無駄になります)ので、これから先遠出の際は水を優先して持ち込むようにしましょう。
Translation
Usually, if you’re not used to it, finding salt can be difficult. There’s also often times where it’s not anywhere nearby. It can take some time for resources to respawn (Items started respawning following an update) so if you’ve depleted the salt within your vicinity you’ll need to go on an excursion. In the grassy Plateaus there are many plains and no tall kelp fields to block your view so it can be easy to find salt, however due to low depths you’ll need to be wary of your oxygen levels as you’re diving.
Additionally, thirst differs from hunger in that it can’t exceed 100 (For example, if your satiety is 95 and your fluids are 95 and you eat a cooked Eye-eye (Satiety +18, Fluids +9) you satiety will increase to 113 but your fluids will stop at 100, wasting 4 points. Because of this, when we go on the beforementioned excursions make sure you prioritize water.

体力(ヘルス)が減ったら
いきなり噛み付いてくる魚、爆発する魚などが原因で体力(ヘルス)が減ることが多々あります。
回復方法としては、満腹度とH2Oを両方80%以上にしておくと自然回復するようになるのでこれを頼るか、クリープバイン(海藻)をナイフで切り付けて得たサンプルから作るファイバーメッシュから作成できる応急処置キットで回復する方法の二つがあります。(応急処置キットは脱出ポッド内の医療用キット製造機に定期的に補充されるので、それを待つのも手です。)
Translation
If your health decreases
There are many occasions where a fish suddenly coming to bite you, or a fish exploding on you will decrease your health. When it comes to ways to recover your health there are two methods. You can rely on healing naturally if your satiety and fluids are both over 80% or you can heal using a first aid kit, which is made at the fabricator from samples cut from creepvines (kelp) using your knife.
(First aid kits are also periodically replenished at the medical kit fabricator found inside the escape pod so be sure to wait for those too)
行動範囲を広げよう
最初に脱出ポッドが浮かんでいる地域は浅瀬サンゴ礁(Safe Shallows)というバイオーム(海域)です。
最初はポッドの近くで魚や鉱物を採取して、ナイフやスキャナーなどの装備を整えたら周辺にある緑の背の高い海藻がある海藻の森(Kelp Forest)や赤い海藻が生い茂るグラッシー台地(Grassy Plateaus)に出かけましょう。
このゲームにはマップが無いので、迷子にならないようにオーロラ号や脱出ポッドの位置で自分の現在位置や方角を把握しましょう。あとでビーコンやコンパスを作成できるようになるともう少し分かりやすくなります
Translation
Expanding your active range
The area in which the escape pod is floating in at the start of the game is a biome called the Safe Shallows (Sandbar coral reef). In the beginning, you can harvest fish and ores close to the pod in order to get your equipment, such as a knife and a scanner, in order. From there we’ll head out into the Kelp Forest, with its tall, green kelp, and the Grassy Plateaus, with it’s densly growing, red kelp.
As this game doesn’t have a map, get a grasp of your current position and alignment compared to the Aroura and the escape pod so you don’t get lost.
Later on, when you are able to build beacons and a compass, this will become a little easier to follow.
遠出をする時は出先で餓死・渇死しないよう水や食料を1つは持ち歩くようにしましょう。
また、深く潜る時には水面に浮かび上る前に酸素が切れないように気をつけましょう。非常手段としては生のブラダフィッシュを持っていればそれを食べると、空腹の他に酸素15を補給する事もできます。
また、ブラダフィッシュとシリコンゴムから作れる浮袋(Air Bladder)を使用すると、非常に速く海面まで上昇できます(水深100mから15秒)。泳ぐのが遅い序盤では頻繁に役立つでしょう。
また、遠出する前には基地でのセーブを忘れないように!
Translation
When heading to your destination, ensure you carry at least one water bottle and a food item to make sure you don’t die from hunger or thirst.
Also, when diving deep, be wary that your oxygen doesn’t run out before you’re able to return to the surface. As a precautionary method, if you have a live bladderfish you can eat it to replenish some hunger as well as 15 oxygen.
Additonally, you can make an air bladder (floatation bag) from a bladderfish and silicon gum which will allow you to rise to the surface incredibly quickly (From a depth of 100m in 15 seconds). We’ll frequently make use of this is the early game, where our swimming is still quite slow. And, before leaving on excursions, make sure you don’t forget to save at your base!
装備や道具の作成
開始直後は何も装備しておらず、海中での行動が制限されています。
まず最初に作るべき装備は酸素ボンベとフィンです。
酸素ボンベは装備することで海中で長く行動できるようになります。
フィンは泳ぎが少し早くなるため、行動範囲が広くなり、魚も捕まえやすくなります。
海中探索ゲームなSubnauticaでは、この二つが出来て初めて、最低限の準備が整ったと言えるでしょう。
脱出ポッド内のファブリケーターやPDAの設計図画面で作成に必要な素材を確認して、採取に出かけましょう。
Translation
Manufacturing equipment and tools
From the moment you start you won’t have any equipment so your abilities while underwater will be limited. In the beginning, the first pieces of equipment you should make are the compressed air tank and the fins. With the compressed air tank you’ll be able to spend more time underwater and with the fins you’ll be able to swim a little bit faster, meaning they’ll increase your range of activity and make it easier to catch fish. It can be said that, for an underwater exploration game like Subnautica, starting off by getting these two items sorted is a minimum requirement.
You can confirm the required materials at the fabricator in the escape pod or using the blueprints screen in your PDA. Let’s go and harvest them.
ボンベとフィンができたら次は、素材の採取に必要なサバイバルナイフやスキャナーなどを作りましょう。
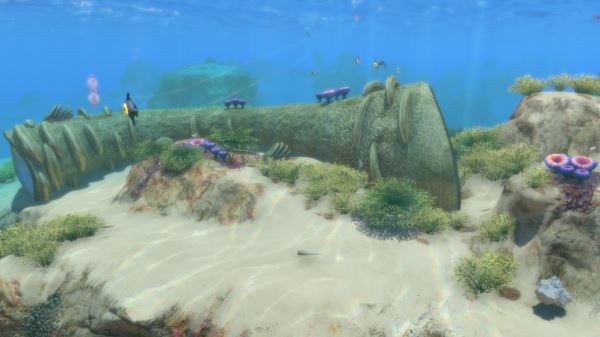
スキャナーが完成したら海中に沈むオーロラ号の残骸周辺に落ちている機器のフラグメント(破片)をスキャンしていくと機器の設計図が作成できます。
小さな残骸が散らばっている所と、大きな船体の残骸が沈んでいる所があります。
Translation
Once you’ve made the air tank and fins the next task is to make the knife and scanner, which you’ll need in order to harvest more ingredients.
With the completed scanner we’ll be able to scan fragments of devices that have fallen into the surrounding areas around the sunken Aroura wrecks in order to create blueprints for them.
There will be some places where small pieces of debris are scattered around and also areas where large wreckages from the ship’s hull have sunken down.
大きな残骸(沈没船/Wreck)は扉や穴から入り内部を探索すると、設計図やフラグメントが入手できますので積極的に探していきましょう。沈没船にある扉は取っ手をクリックするだけで開くものもありますが、扉の横のパネルをリペアツールで修復しないといけない場合や、扉にレーザーカッターで穴を開けないといけない場合もあります。必要なツールがない場合は後でまた来ましょう。
リペアツールは比較的簡単に作れます。作成したらまずは脱出ポッド内で壊れている機器を修理しましょう。
レーザーカッターは設計図と材料の入手が多少困難なので後回しになるでしょう。
Translation
Larger wrecks (Sunken ships/wrecks) will have doors or holes in them meaning you can enter and search inside. You can obtain blueprints and fragments by doing so so definitely make sure you do.
When at the doors of sunken wrecks, simply clicking the handle should open them, however there will also be instances where you’ll need to use the repair tools to repair the panel next to the door or use the laser cutter to open up a hole in the door itself. If you don’t have these tools we’ll come to this later on.
The repair tool is comparativelly easier to make. Once you’ve made it the first thing you should do is fix the broken devices inside the escape pod.
As getting the laser cutter blueprint and materials is considerably more challenging we’ll postpone this for now.
敵性生物
浅瀬サンゴ礁や海藻の森にいるサメのような敵性生物ストーカーに襲われたら、小さな魚の近くを通れば注意をそらして追跡から逃れられます。
また、洞窟内には近づくと巣から飛び出し追いかけてきて爆発するクラッシュフィッシュが潜んでいる事があります。至近距離で爆発されると体力が大幅に減るので急いで逃げましょう。しかし空になった巣には素材となるケイブサルファー(硫黄物質)が残されているので回収しておきましょう。リペアツールやレーザーカッターなどの材料として有用です。
Translation
Hostile creatures
If you are attacked by hostile creatures, such as the shark-like stalkers in the Safe Shallows and Kelp Forest, you can swim past small fish in order to divert their attention and evade pursuit. You may also find there are crash fish lurking in the caves that will jump out of their nests if you get too close. They’ll then chase you and then explode.
If they explode while next to you they can take a significant amount of health so be sure to run away quickly. The good news is that when their nests are empty an ingredient called cave sulphur (sulfuric material) is left behind so be sure to collect this. This is useful as a material for both the repair tool and laser cutter.
グラッシー台地にはサンドシャークやバイターが多数居ます。サンドシャークが突っ込んで来たら目線を合わせつつ横に移動してかわしましょう。何度か避けると離れてくれます。バイターは小さな赤い魚で、バイオームの海藻の色と似て見つけにくいです。体力は少ないので近づかれたらナイフで倒すのが手っ取り早いです。この辺りはまだまだ安全な部類に入りますが、このエリアを抜けた先はほぼ危険地帯です。
特にリーフバックとは違う、声のようななにかが遠くから聞こえたら、ヤツに見つかる前に引き返して下さい。
Translation
Many sand sharks and biters are found in the Grassy plateaus. If a sand shark charges at you, continue to keep it in your sights and move sideways to avoid it. Once you dodge it a few times it will leave you alone. Biters are small red fish and because they resemble the kelp of this biome they can be hard to see. They don’t have much health so if they approach defeating them with your knife is the quickest solution. This area is still quite safe to be in, however there are dangerous zones from here.
If you do hear a cry from afar that doesn’t sound especially like a reefback, please turn back before it finds you.
夜間の行動は控えよう
夜間行動する場合、海の中は非常に暗くライトを使っても昼ほど見渡すことができません。そのため危険な生物にいつの間にか近づいていたり、海中洞窟から帰れなくなったりします。慣れるまでは夜間の行動は控え、海面近くで魚を獲ったり、拠点内のベンチでのんびり過ごしたりしてみましょう。
幸い寝なくても特にデメリットは無いのでご安心を。
もう少しゲームが進んでベッドが作れればスキップする事も可能ですが、
初期の状態では製作する事は出来ないのでご注意。
ただ、上記のブラダフィッシュ(Bladderfish)は発光するので夜間のほうが見つけやすかったりします。
Translation
Refrain from doing things at night
It can be extremely dark in the oceans during the night. Even if you use a torch you still won’t be able to see as far as you can in the daytime. Due to this, dangerous creatures can get close to you before you even know it and you can get stuck with no return in underwater caves. Until you become accustomed to it, refrain from activities at night. Just capture fish close to the surface and spend your time leisurely on the bench in your base.
Also, find relief in the fact that there are no disadvantages from not getting a comfortable rest.
As you progress further into the game you’ll be able to make a bed that can use to skip through the night, but for now you are unable to make one so you’ll just need to be cautious.
Another good thing is that the bladderfish mentioned above are luminescent at night making them easier to find.
いろいろ作ろう
ビルダーを入手すると建造物を作ることができるようになり、行動の幅が広がります。
ただ、クリエイティブモードと比較してもらうとわかりますが最初からは作れないものが幾つもあります。またファブリケーターで作成できる機器にも、設計図が無いと作れない物があります。
徐々に近海から探索し、フラグメントを見つけ次第スキャナーを使用してスキャンし、設計図を手に入れましょう。
とりあえずは脱出ポッド周辺の浅瀬サンゴ礁、それからポッドの東西南北に出かけて海藻の森、グラッシー台地あたりで沈没船を探索しましょう。それ以外のバイオームは深度も生物の危険度も増していきます。
Translation
Making various things
Once you’ve obtained the builder tool you’ll be able to make structures, expanding your effective range, only, unlike the creative mode, in the beginning there are quite a few things you aren’t able to make. This is similar to the way in which there are items you can’t make at a fabricator if you don’t have the blueprints.
Gradually, as you search the nearby waters, depending on what you scan, you’ll receive more blueprints. Let’s continue first to search the Safe Shallows areas around the escape pod, then head out in cardinal directions from the pod into sunken wrecks throughout the Kelp Forests and Grassy Plateaus. Outside of these areas the depths and danger of creatures will continue to increase.
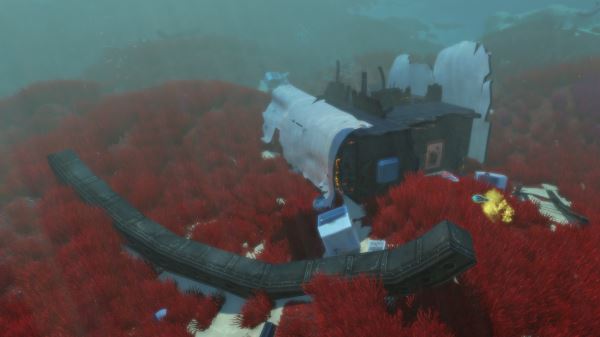
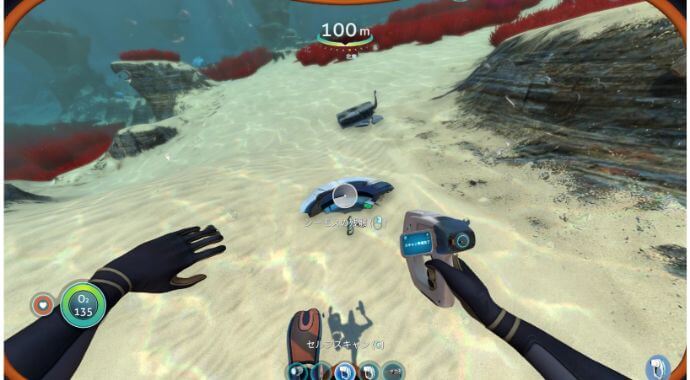
アップデートによりフラグメントはただの白い箱ではなく、以下のようなアイテムの残骸や実物等をスキャンするものに変更されました。又、大半の設計図は海中に沈んでいる何かの残骸や廃墟といった人工物の内部か周辺に配置されています。海中を潜っていて怪しい残骸を見つけたら積極的に探索してみましょう。
スキャンできるフラグメントに近づくと、画面右下にスキャナーのアイコンが出るので判断できます。
Translation
Following an update, fragments aren’t just found in white boxes but have been updated to include scanning item remains and whole objects themselves like you can see below. Additionally, the majority of the blueprints are found inside or close to man-made structures, such as submerged wreckage or ruins. If you find suspicious looking wreckages while under the surface, definitely try searching through them.
You can tell if you’re approaching scannable fragments as a scanner icon appears in the bottom right corner of the screen.
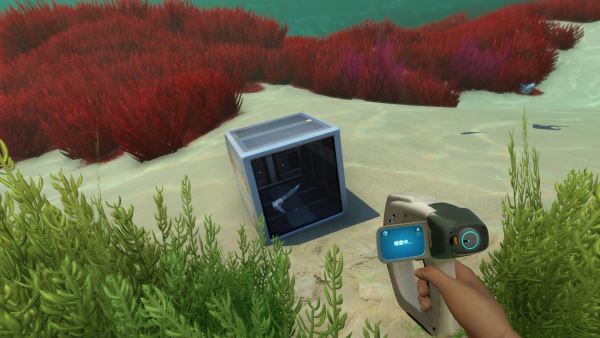
データボックスに関して
最近のアップデートにより新たな設計図の入手方法が追加されました。
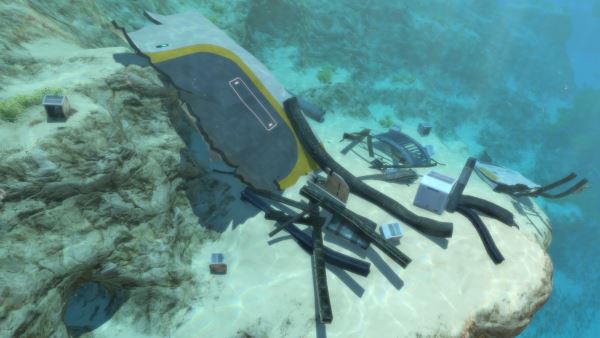
沈没船や脱出ポッドの付近にはこのようなデータボックスが設置されるようになりました。
これらの内部には設計図が入っており、箱を開けて入手することでフラグメントと同様に作成を解禁する事が出来ます。
Translation
Regarding data boxes
In the latest update a new way to obtain blueprints was added. Data boxes have now been included near sunken wrecks and escape pods. Inside you’ll find blueprints that, simply by opening the box and taking them, will unlock new crafting just like the fragments do.
External Links
Game Review
Subnautica
You can easily get addicted to going a little deeper and spending a little longer away from the safe shallows each time. This game is not only fascinating but it is breath taking.
